Friday, May 18, 2012

Fibers on Friday. Grannies!


I've been pecking away at Granny Squares this week. They are so awesome and quick and happy!


I've had this pinned on Pinterest for quite some time and I'm finally getting around to making it.


Follow Me on Pinterest


Wednesday, May 16, 2012

Sit-Upons for Girl Scouts

I'm a Girl Scout Leader for my girls' Daisy Troop. They are in their 2nd year, so this year they were old enough to experience a little of what camp would be like. I didn't think they were ready for an overnight trip, but we went out to the site for the day and visited older scouts.

Along with exploring nature, learning about camp life, and participating in a scavenger hunt, I wanted a couple other projects pertaining to camping. Since this is also my first experience with Scout camping, I spoke with a few other leaders and learned about sit-upons. Evidently, it's a universal rule that no scout ever sit in an adult's chair or seat. It all boils down to fairness and equality....if one girls steals her mom seat and the other girls are left sitting on the ground, it's just not fair and could show favoritism. So.....the creation of sit-upons!

I chose to make them out of vinyl table cloths. I bought new ones (all matching to avoid fighting over certain designs), but finding gently used ones at thrift stores would be a great option, too).

I folded them in half, just eye-balling how big they'd need to be for tiny little butts to sit upon. I left a little over hang because I intended to sew strips into carrying straps, but later decided against it.

I then cut them width-wise just equally dividing the table cloth.

Here's a shot with the strap portion detatched

So, now we're left with square(ish) fabric that is folded along the bottom (so no sewing required there), that needs to be sewn up 2 sides, stuffed, and then sewn along the top.

I opted to sew the two sides ahead of time at home and then have the girls stuff their own sit-upon with news paper and sew along the top with yarn at our meeting. Real simple, I just turned them inside out and sewed up the two sides.

For the remaining top side, we used a hole punch to punch holes for the girls to sew yarn into. This was a little hard....not sure I'd recommend it. I think having the girls use duct tape or taking them home to sew after stuffing, would have been better.


Speaking of the stuffing. We just used newspaper. I let the girls choose whether they wanted just a couple layers of flat papers (to protect against the cold ground) or if they'd like to crumple them up for a more cushioned affect. I was leaning more towards just flat layers, so the sit-upon would be easier to just fold up and carry in their back packs.


Then I let the girls apply scrapbooking letters to spell their name. I went over the names with a layer of modge podge to help it stay. Time will tell if they hold up!

Monday, May 14, 2012

A Thneed's a Fine Something that Everyone Needs

I showed you some of my creations for the Lorax Themed Birthday Party here.

I wanted to show you the Thneeds I made! I wanted to play on the "sack race" game at kids' parties, but in keeping with the Lorax, I came up with Thneed Races! It was so much fun!

I bought 4 yards of CHEAP knit fabric, folded it in half and laid a tight fitting outfit my kids wear to use as a pattern on top.

You'll recall from the story, Thneeds are pretty wonky and haphazard, so I cut mine out with 4 arms and just left the bottom as a tight fitting skirt kind of.

I simply sewed all around the Thneed, leaving the head and bottom open, but not intended for the arms to really be used as sleeves since the kids would just be squeezed into it without the use of their arms (more on this later....)

I made two thneeds so we could have races in pairs. It was quite fun, but a tad dangerous!! The kids had quite a few episodes of falling right on their face! You see, with sack races, at least they're holding on to the top of the sack, and if they fall, they can at least let go and catch themselves. With this.....design....ummm....yeah, they couldn't break their fall. So, perhaps there would be a safer way....or perhaps these kids were just crazy competitive and should have slowed down.

You be the judge :-)

Thursday, May 10, 2012

Fibers on Friday: Freezer Paper Stencil Method

I needed to make a special new baby and special little onsie to honor his special big brother :-) I knew nothing store bought would cut it, so I looked around at how people do stenciling with freezer paper onto fabric. Here goes:

You'll need freezer paper. Not waxed paper and not parchment paper. you'll need some fabric paint and a sponge brush.

I used my Cricut to cut out the words and little stars. This required the LOWEST speed and the LOWEST pressure.

Then you iron the images onto the fabric, tacky side down (make sure you've cut the images with the tacky side down).

Then paint! As you can see I was using a dark fabric and I wanted the red to be bright and vibrant. So, I needed to apply 3 coats all together, letting them dry in between.


And that did the trick. It turned out just as I had hoped....even better!


Thursday, May 3, 2012

Fibers on Friday: Seeing Stars

And more on the potholderpalooza front!! I made these two pot holders this week. Along with finishing up the turtle I showed you last week. But, I still need to finish the hat, so I'll show you the whole thing entirely next week!


Not sure if I mentioned here or not that I'm moving. Again. 9 months after moving here in the first place. It's crazy!! Our landlord sold our house, so we gotz to go. Fortunately we found another rental a few doors down, so we're gradually shifting our stuff up the road.

There are many pros and cons to this move. Not the least of which is my anguish over having to leave my newly planted garden! but, I'll try to work out a co-op situation with the new owners!! that would be a TRIP@!

But, one good thing is a huge wall in the kitchen that is screaming for a potholder collection!! So, I'm going to be good to go with this little artistic display of potholders!!


Tuesday, May 1, 2012

Lorax Birthday Party: Part One

We've always loved the story of the Lorax. After seeing the movie in the theater, all these ideas came crashing to me for a Lorax Themed Birthday party. I mean, the possibilities!!! My first bout of inspiration came from the Truffula Trees. I knew I wanted to make Truffula Tree Cake Pops. A quick search led me to Bakerella (of course) and here's how I did:


I had some on display and others were used on the cake (which I bought! Gasp!!)

I had no problems with the cake pops whatsoever! Some people complain of the the coating cracking...or the pops get too heavy and slide down the stick...so, here's what I did that may have aided my success:

  • After the cake was baked and crumbled, I only added about 3/4 of a can of frosting.
  • I only refrigerated the pops for about 15 minutes prior to dipping the the candy coating.
  • I dipped the stick in a little of the coating before sticking it into the cake ball. Some will squeeze out the bottom, but once it hardens, it forms kind of a little stopper so the cake ball won't fall down the stick. I used the colorful candy wafers found at most craft stores and just warmed them in coffee cups in the microwave until it was good for dipping.
  • I did not refrigerate at all after dipping the pops and forming them into Truffula Trees. I just stuck them into some styrofoam and they were happy over night and did not crack, did not slide, and did not get wet or sticky.

Next up...Truffula Tree Decor:

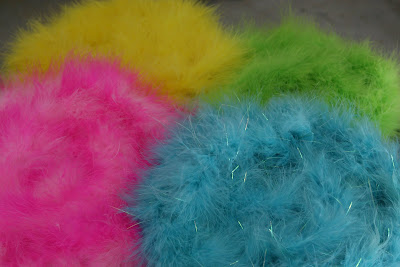
I got this idea from here. The idea is to form truffula trees by putting some feather boas onto a cardboard circle. What really helped with this is the use of my scrapbooking stapler because it has a really long neck to reach into the center of the cardboard. These boas I got from Hobby Lobby and they are just perfect colors!!

Bruce made some stands for them by cutting up some scrap lumber he had.

Stay tuned for how I made Thneeds for Thneed races, how we put together a Whisper-ma-Phone, and a cute little party favor......