Thursday, December 30, 2010

Fibers on Friday: Turning Heels Challenge Starts NOW


Are you ready for this? Have you gotten your supplies and checked your gauge? Are you ready to

TURN HEELS IN THE NEW YEAR?


I am! I spent the week finishing the sweater for Afghans for Afghans. I'm proud to report that this is my second sweater I've knit and donated to the cause. It feels good. Do what feels good! Take a look at my sweater, if you will, and also hop on over and read about the cause. Depending on how this sock challenge goes, we can do a charity challenge in the future!


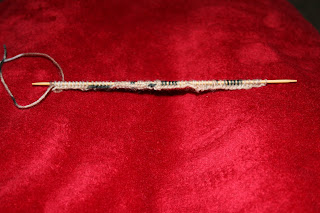
I had to knit 3....count them THREE swatches in preparation for socks. My gauge was just too big, so I'm ending up with size 0 needles, something I was really hoping to avoid. Oh well. And want to hear what else? I'm using a yarn that I had in my stash....one skein...and I have no idea what it is! So, stay tuned for the debacle that's sure to ensue when I run out of yarn!

So, I cast on last night and took some pictures along the way just to sort of guide those of you who have never cast on the double pointed needles for knitting in the round. This is what we need to start now so that next week we can link our cuffs and the leg of our sock. If you'd like to read my proposed time line for this challenge, please read here.


Cast on 64 stitches on to one of the needles


Divide the stitches onto 3 needles as outlined in the pattern; 16....32....16


Now, join in the round. I do this by slipping one stitch from the left needle over to the right needle. Then, I slip the second stitch that's on that right needle over to the left needle. You're just criss crossing stitches and that secures the work and you're ready to start knitting the cuff.

Ines, over at Forward Tumble, wrote a detailed tutorial on casting on and knitting socks, complete with tons of pictures for those of us who need a visual.

Make sure your stitches are not twisted before you start knitting!
Make sure you're knitting in the direction you're suppose to be! I've been known to put down my knitting and when I pick it back up, I've gotten it backwards so I'll actually be purling where I should be knitting.

Knit the cuff in knit 2, purl 2 ribbing. Come back next week to show us what you've got! I can't wait to see who's participating. Got questions? Need help? Post a comment and I know you'll get help from me or someone else!


Wednesday, December 22, 2010

Fibers on Friday: A Challenge!!!

Friends, I'm so excited for this! Are you ready to take on a challenge for the New Year? Are you ready to get out those teeny, tiny little double pointed knitting needles and very fine yarn? Are you ready to join together as a knitting community and tackle a daunting project together....with support? Well, then join me for a New Year's Challenge for Fibers on Friday:

Turning Heels in the New Year!


It's SOCK time!! So here's my history with socks; I had barely graduated from washcloths and scarves and I dove right into socks. I completed the entire first pair and they were definitely wearable, but not for me. They were too big and bulky, think Wig Wams in 1990. So, I gave them to my sister in law who works outdoors.


Then I attempted the second pair with sock weight yarn. I wasn't happy with the tension, though. They seemed too loose and just not fitting, so I frogged them.

I thought I needed way smaller needles (size 0), so I bought those on line and attempted socks for the third time. Still not loving the whole process, so I gave up entirely.

But I'm still very determined to knit socks that I love and want to wear. So, I challenge you all to knit along right along with me. Whether or not you've ever knit socks! Whether or not you've even ever followed a pattern! We can do it! And if there are sock pros amongst us, good! Please join us and encourage us and teach us!

Here's my plan: to knit a pair of socks by the end of January:
  • By Dec. 31st everyone needs to have gathered their supplies and checked their gauge.
  • January 7th we'll show off our cuffs and leg of the sock.
  • January 14th we'll show off our heels. Yes, Turning Heels in the New Year!
  • January 21st we should be done our gussetts and foot and be ready to close the toe.
  • January 28th we'll be well into our second sock and we'll display our works in progress.
  • By Feb 4th we should be able to take a picture of our feet adorned in TWO fabulous socks!!
What do you say? Sound doable? Are you game? Here are the supplies you'll need:
  • sock yarn- 2 balls
  • double pointed needles-size US 2 or size to obtain proper gauge
  • this pattern-Silky Soft Socks by Premier Yarns as found on Ravelry and here is the PDF
  • The one and only sock knitting book I own is called Getting Started Knitting Socks. Maybe look for it at your library this week if you're so inclined. I found it very helpful.
It's a party guys! It's a challenge! I even created a button to grab for the event (Image courtesy of Forward Tumble who is way excited for this challenge!!) So post it on your blog, tell your buddies and let's turn some heels!!

Fibers on Friday

In light of all this excitement, let us not forget about this week's Fibers on Friday! I've been diligently knitting away on the a4A sweater. I completed one whole sleeve yesterday and started the second sleeve this afternoon. I was running really short on the teal yarn, so I switched to black for the cuff. Here is my enthusiastic model (click on image to enlarge for full hilarity):


Saturday, December 18, 2010

Save Those Christmas Cards!

What do you do with all the Christmas cards you get in the mail? Do you drop them into recycling? Save the photo ones for posterity? Well, for 3 years now (maybe more) I've been saving my cards and using them the following year for gift tags. I took some pictures the other day of the cards from last year that I've been saving right in with my wrapping paper.


I just cut the cute little snow bird out of the card and it's the PERFECT gift tag!

A lot of the cards have lots of space with no writing, but sparkly little decorations that are perfect for tags.

You'll end up with some big tags, some little ones, and some you can even keep the sentiment.

I'm thinking it would be even cuter to cut some shapes out with a scrapbooking punch (scalloped?) or you could use a hole punch and attach the tags to the gifts with ribbon, or you could even run these small tags through a sticker maker and turn them into sticky tags!

I probably won't even need to buy tags this year. Which is great because I'm attempting to really reduce the amount of packaging all together this Christmas....and I have a nice little stash of random boxes and containers that I've been saving all year for such an endeavor! More on that later.

So there you have a little idea for re-using a little before you recycle!

Thursday, December 16, 2010

Fibers on Friday: a4A Progress


The only thing I've worked on this week (as knitting goes) is my Steppe Ahead Sweater for Afghans for Afghans.


I'm still enjoying it, but I have to say the pattern gets kinda hectic at times. Nothing unmanageable, but hectic! I should have taken pictures of some of the jumbled mess I had going on, but here's the run-down:
  • 2 straight needles were acting as stitch holders for the live stitches for each front shoulder piece as I knitted the back.
  • 1 set of circular needles as I was knitting the back.
  • 1 length of cut yarn hanging off 1 straight needles to use for 3 needle bind off when ready
  • 1 entire ball of yarn hanging off the other needle ready for picking up and finishing the collar.
  • 1 entire ball of yarn as working yarn for the back.
Wow! Gobbly-goop! It all works out, it's just crazy. And I'm lucky to have accumulated all those needles and had them handy.

So, what was new? What have I learned? 'Cuz we all know, if we're not learnin' we're burnin':

The three needle bind off!

I was quite intimidated by this process, but I watched a video on youtube and then got to it. And it was easy! I mean aside from adding 2 more needles to the gobbly-goop! And it created the most astoundingly beautiful seam! Look


Tuesday, December 14, 2010

I've Gotten Lucky

I've been meaning to blog about this win for so long! When I first started perusing blogs it seemed like there was a give-away every day. Of course, I entered a lot! Like, especially on Pioneer Woman's site, but HELLO!, she's got like millions of entries now, so I kinda gave up. But, I came across a give away for some fabric and I just could help but enter.

AND I WON!!

I won 5 yards of Christmas-y fabric from Raspberry Creek Fabric on Etsy. So, it was such a nice give away, I figured I should give them a shout out. Visit her shop and drool over her wonderful fabric selection!


I also won some soap! I've been using Goat's Milk Soap for over a year now. I order from Goat Milk Stuff. Their soap is great! The bars are so huge that I cut mine in half, so I feel like I'm getting 2 for the price of 1. There is a big selection of 'flavors' and I've loved them all. I buy the bars....so, there's no plastic packaging, just a cute little muslin bag. Granted, there is shipping involved, so it's not the greenest of green here, but I feel good about supporting this family business.

So, I just placed an order last week. A few days later I get an e-mail out of the blue saying I won their newsletter drawing so I get a duplicate of my last order for free! Yay! Random and unexpected and a nice surprise. When I wrote the lady to thank her for such a wonderful surprise and tell her how much I love her product, she repsonded by saying, "Oh good, I really hate to send soap to people who don't like it." That cracked me up. So go check them out if you're in the market for a nice and natural bar of soap.


Sunday, December 12, 2010

Meatless Monday! Orange Glazed Tempeh and Broccoli Rabe


The other night my husband and I were watching one of those "How It's Made" shows on TV. The particular episode was about tempeh. Have you cooked with tempeh? I only have one other time and it was a long time ago. I made a meatless loaf out of it; it had shredded apples and carrots and I remember it being quite yummy.

So, we're learning about tempeh and how it's fermented with a fungus called Rhizopus oligosporus. I turned to by husband and jokingly said,

"I Love Rhizopus oligosporus!"

"I'm gonna make a tempeh recipe." He said, "Don't feed it to me." I proceeded to tell him he's eaten it before but he says it doesn't count since it was a million years ago.

Anyway, here's the recipe I made from 101 Cooks:

1 cup freshly squeezed orange juice (3-4 large juicy oranges)
1 tablespoon freshly grated ginger
2 teaspoons tamari (or soy sauce)
1 1/2 tablespoons mirin
2 teaspoons maple syrup
1/2 teaspoon ground coriander
2 small garlic cloves, crushed
roughly 10 ounces of tempeh (or extra-firm tofu)
2 tablespoons olive oil
1/2 lime
a handful of cilantro (coriander) leaves

Put the orange juice in a small bowl. Squeeze the grated ginger over the bowl to extract the juices, then discard the pulp. Add the tamari, mirin, and maple syrup, ground coriander, and garlic. Mix together and set aside.

Cut the tempeh (or tofu) into thin-ish, bite-sized pieces, and if working with tofu, pat dry with a paper towel.

Put the olive oil in a large frying pan over medium-high heat. When the oil is hot but not smoking, add the tempeh and fry for 5 minutes, or until golden underneath. Turn and cook the other side for another 5 minutes, or until golden. Pour the orange juice mixture into the pan and simmer for 10 minutes, or until the sauce has reduced to a lovely thick glaze. Turn the tempeh once more during this time and spoon the sauce over the tofu from time to time.

Serve the tempeh drizzled with any remaining sauce and a squeeze of lime, with the coriander scattered on top.


I served this over rice with some sauteed broccoli rabe. It was our first time eating this bitter green, too, so it was quite the adventurous night. We ate the whole meal, but we weren't thrilled about it. I think the orange glaze was delicious. The tempeh was a little bitter (or something) and pairing it with the bitter greens wasn't the best idea. I will definitely make this recipe again, but I'll do it with tofu instead.

Saturday, December 11, 2010

Simple Knitted Washcloth


Here is the washcloth I started last week. I used the pattern that came with the yarn, Sugar 'n Cream Twists. You can't see by the pictures, but there are rows of garter stitch throughout the washcloth.

Cast on 45 stitches using US Size 8 needles
Work 5 rows garter stitch.
Then work 4 rows stockinette.
Repeat 8 times.
Cast off.

I randomly changed from garter to stockinette whenever I felt like it and for however many rows I felt like. So, it's just random and I like it that way.

This was a nice, simple project to have going at the same time as a sweater. Easy to just pick up when I didn't have a lot of time or willingness to work on something important.

Thursday, December 9, 2010

Fibers on Friday: As Ugly Sweaters Go.....

So, here's the super fun thing I have planned for this weekend: An Ugly Sweater Party!! Last month was our first annual Witch and Bitch. This month is Ugly Sweater Night! So, my friend is the one who had the idea for this. She has THE ULTIMATE ugly sweater. I kid you not....it is the REAL DEAL. The sad part (or maybe really really cute part depending on how you envision this.....and I love to envision the back story on thrift store finds) is that I'm pretty sure this sweater was hand knit. I see it being worn by THE CUTEST little old WHITE haired lady to BINGO night. Or maybe even to a Square Dance. Totally. I see her being just darling and adorable. And I see her having put a lot of time into knitting this sweater. But, nonetheless.....it's UGLY! I can't wait to show you pictures!

Anyway, I feel like I have BIG shoes to fill when it comes to matching this sweater. I had a fairly ugly sweater in my closet. Let it be known, I've actually worn this sweater despite its ugliness. So, I just wanted to embellish it to make it uglier. Here we go:

I added a pom pom ruffle to the collar and the sleeve cuffs. I added tassels to the shoulders and jingle bells all over the front. My husband thinks I should leave the strings attached to the bells.


When my girls got home from school, I asked if it was ugly enough. Paige said no, I needed to add a big bow to the front and center. Madison said I need to add a ruffle to the bottom. Both very good suggestions, I must say. I'll work on that tomorrow. But, as ugly sweaters go, does this suffice?

Now, onto Fibers on Friday:


Here is the Steppe Ahead Sweater I've been working on for Afghans for Afghans.


The front is almost finished. I like the garter stitch running down the center and forming a collar. The back is only half done. Then I'll pick up for sleeves. I plan on it being long sleeved, but I fear I'll run low on yarn, so it may have to be a vest. The campaign says that is fine, but I'd rather send a long sleeved sweater.

I'm enjoying knitting this. I love thinking about how important this campaign is. It's an easy pattern and I love the yarn. Win! Win! I am anxious, though, to start my Shalom sweater that's waiting to be cast on....for me.

If you'd like to read more about a4A, visit the link below.


Monday, December 6, 2010

Meatless Monday! Crusty White Bread

I will never go to a bakery for bread again! This recipe was incredibly easy (albeit time consuming) and incredibly scrumptious! You have to start this process the night before you intend to eat it. It's easy, though! You don't need a warm spot to let it rise, a slower (cooler) rising times helps with the flavor of the bread. I made this bread to go with this Beef Stew and let me just say...DIVINE! It's from this month's Mother Earth News Magazine.

Crusty White Bread Recipe

This rustic white bread spreads out as it bakes, which forms natural breaks in its surface crust, creating a dramatic presentation. This bread is made with fairly wet dough, which is a requirement if you want big holes in the crumb, and it’s leavened with a small amount of yeast, which provides the opportunity for a long, cool rise — overnight and most of the next day at a cool room temperature. The long, slow rise lets the yeast and various enzymes develop maximum flavor in the dough, and also makes for a chewy texture. You can put a crisp crust on any non-enriched dough (flour, water, leaven and salt; no eggs) by baking it on a baking stone and setting your home oven to its highest temperature.

Ingredients and Supplies:
1 pound unbleached white flour
1 tsp dry yeast
1 tsp salt
1 1⁄3 cups water
Baking stone or cookie sheet
Pizza peel or heavy piece of cardboard


Note: If rehydrating yeast with water, subtract the amount of water you added to the yeast from the 1 1⁄3 cups in the recipe.


Directions:

Starting the night before baking day, in a large mixing bowl use your hands to mix the flour, yeast, salt, and enough water to a form a soft and sticky dough, though the exact consistency may vary with the flour used. Cover, and let the dough rise at room temperature. When you get up in the morning, wet your hands, lift dough onto a flat, wet surface, then gently stretch it and fold it in half 2 to 4 times. Return dough to the same bowl, cover, and let it rise until it has doubled in size. If you take the temperature of the dough with an instant-read thermometer and it’s below 70 degrees Fahrenheit, you may want to put it in a warm place, otherwise the rise may take until the afternoon.

While the bread is in its second round of rising, line a bowl that will comfortably hold double the amount of dough with a cotton or linen cloth heavily dusted with flour. When the dough has doubled, gently turn out onto a work surface, and with wet hands and a dough scraper (if you have one), stretch and fold, and turn 2 to 4 times until the dough begins to stiffen and assume the shape of a ball.

Place ball into the bowl on the well-floured cloth. Cover, and let rise until the dough has almost doubled again, 1 to 4 hours depending on room temperature.

Turn onto a well-floured pizza peel or a well-floured piece of heavy cardboard. Slide onto a baking stone or cookie sheet in an oven preheated to 500 degrees. Bake until the crust is golden brown on top and the bottom crust is hard and thumps like a drum when you tap it (about 30 to 40 minutes). Set to cool bottom-up for at least 2 hours before slicing.

Note: Adding humidity to the oven always improves bread crusts. To achieve this, try keeping a pan filled with water in the oven while baking. You can also try baking with a stainless steel mixing bowl over the bread.


Saturday, December 4, 2010

My Very FIRST Furniture Refinishing Project!

This project has been rattling around in my head for more than a year. I was so reluctant and nervous and intimidated to embark on this endeavor for many reasons; not the least of which was due to the sentimental value of this piece of furniture. This dry sink belonged to my Grandmother. I remember it in her house when she was actually using it. But, when I took it it was just sitting down in her basement collecting dust.

Dry sinks were used back in the day before indoor plumbing. The top is often recessed and lined with copper to hold a wash basin and pitcher of water. The cabinet would holds towels and shaving supplies. A lot of dry sinks have a towel bar on the side.

I've used this one to hold our fishtank, which is PERFECT!

This is how it looked. It's bad, I know! But, like I said, I was nervous to get started. I didn't want to totally ruin this piece of furniture. Plus, I'd NEVER worked on a piece of furniture and I really wanted to do it by myself, with minimal help from my husband. So, it sat in this condition until I was ready.


I stripped the entire thing using sandpaper. No chemicals!

I primed it and then I painted it yellow! Yes, yellow! My husband thought I was NUTS. I had a distinct vision of an antique yellow finish. Granted, I was so nervous along the way! This first coat of paint was BRIGHT! Way too bright!

But I still had to apply the glaze. I went with the Ralph Lauren glaze in "Tobacco". It seems to be the favorite amongst bloggers who post about refinishing. So, I trusted their judgment!

It took some finesse. It took three coats of glaze to tone it down. It took a lot of patience because I wanted this done YESTERDAY! I'm not good at waiting for things to dry! But, here it is in all it's glory:


I kept the copper bottom in rustic condition. I was going to polish it up, but I think it adds character. Actually, I was going to tile the whole thing in mosaic, but now I think it would take too much away from the antique-ness of the piece. So, like this it will stay and I'm

in love!

I think Mimi would be fine with this! And now I have the itch to do much more! One of my kids has an 1800's dresser from my mom in her bedroom. Oh yes, I'll be refinishing that as soon as winter is over and I can do the project outside. oh yes!

Thanks for sharing in my excitement. Please see my sidebar for all the fabulous places I'll be sharing this project with this week :-)